The conversion
I originally started the conversion in February 2005 and it was March 2006 when I first had it on the road and MOT'd. At that time it had the original renault 5 GT Turbo engine in (slightly uprated) but in early 2008 the turbo went and at the same time I embarked on renovating my house so didn't have time to fix it. However by February 2009 I had picked up a Clio phase 2 172 engine and aftermarket Emerald ECU and had decided this was the way to go if I wanted trouble free performance motoring as the theory is you have less components to worry about. Mid 2009 the car was ready and after a few teething problems mostly down to needing a full tune the car was ready for my first sprint!
I have quite a few photos and details of the first build phase on my website www.gomodit.co.uk, . I re-designed the rear compartment in the second phase to be more like the original Renault 5 Turbo 1/2's of the 80's. This also meant there is now a proper sealed fire barrier between me and the engine which was essentially to get it past the scrutineers at a sprint day. This has been created with a steel frame providing additional structure, a steel panel between driver and engine.Plus an aluminium top cover to keep the weight down.
The engine sits in the original renault 5 subframe, and is bolted to a heavy duty crossmember which in turn is fixed to the original rear subframe mounting points. The rear of the subframe is bolted to fabricated mounts which are welded to the rear chassis rails. The rear engine mount whilst standard has been lowered to clear the clio exhaust manifold. The clio top mount has been used to prevent sideways movement and an additional front tie bar has been fabricated to stop engine movement under hard acceleration.
The car is road legal and is taxed and MOT'd . I Insure, as being rear wheel drive and based the policy on a Clio 172 with all the mods declared it costs me £360 TPF&T based on a 34yr old with full no claims.
The rear end of this car whilst using mostly standard parts, although it does have modified rear suspension to lock the rear wheels.
The bad bits
The headgasket has gone, I bought a new bottom end had the bearings replaced and put it back together costing me £650 in total then after my first run the gasket went. I've tried to keep enthusiastic but my circumstances have changed and can't justify putting anymore money into this project. The body work is in great condition but has a few marks here and there and a couple of dents that may come out via dentmaster or someone simular there is nothing glaringly obvious.
The engine is currently out as I was going to fix, but can be put back in and heard running as there are no problems just a lot of white smoke!
Spec is as follows:
* Clio 172 Phase 2 Engine (approx 66k miles when bought) with Phase 1 throttle body (cable type)
* Emerald ECU see www.emeraldm3d.com this will give flexiblity if you want to turbo/supercharge or just modifiy the engine further in the future.
* Four paddle clutch
* 2x Bucket seats 1x Fibreglass magnum in black this is extremely lightweight and has the same stiffness as my friends Sparco 1x Cobra Monaco S steel frame both seats are in exceptional condition
* recently tuned by Dave Walker of Emerald (seen in the practical performance car magazine) it gave 183bhp (see printout in pictures)
* Full safety devices roll cage with door bars and additional cross bar for harnesses
* 6 point TRS harnesses
* Lotus Elise Stainless exhaust
* Removable engine cover in aluminium
* Professionally Fabricated aluminium fuel tank
* Aluminium oil seperator
* Coilovers one pair are CUP shocks that have oversized shafts for strength and one pair are standard shocks both a coilover conversion see my article http://gomodit.blogspot.com/2007/12/...-december.html
* Also included are 4 sets of 2.5coilover springs for the rear and 3 set for the front
* Up-rated discs and pads, I’m not sure which but they stop the car.
* Hydraulic handbrake and brake bias for manually adjusting how much braking the rear gets
* Hydraulic clutch for a lighter pedal and does away with an extra cable
* Fire extinguisher never used
Do get me wrong I love the car but as you can see I've had it a long time and spends most of it in the garage so it's time to sell it to someone who might get more fun out of it.
Cheers
Andy
Thursday, 28 April 2011

Wednesday, 21 July 2010
Windscreen removal and surround repair on the Renault 5 GT Turbo - July 2010
With the car off road it's time to do some repairs
The first job being sorting out the rust around the windscreen. Over time the laminate had lifted in one of the corners of the screen and a slight crack had appeared. Then more recently a large crack appeared from top to bottom so I could no longer ignore it.
The first job was to remove the windscreen, I could have called a specialist but I would have incurred two call out charges as I need it removing and refitting at a later date once the rust had been sorted. Fortunately I have a friend who had the tools but found out the method of removal was a lot simpler than I first thought. The main kit basically involves a piece of abrasive wire and two handles that the wire sits in(shown in the top left of the picture --> ). After removing all the plastic trim, you slot the wire around and under the windscreen then start sawing, being carful not to burn the dash or chaff any of the paint work. You can make your way around all the screen but may need to finsh off with a long bladed stanley knife. I thought I'd save you the trouble and point you to all the stuff you need pictured on the right, this kit also seems to come with the rubber removal tools which is quite handy.
After the screen was removed, I got the wire brush out this is when I realised the rust was a little worse than first expected!
well I say rust it turned out they were actually holes

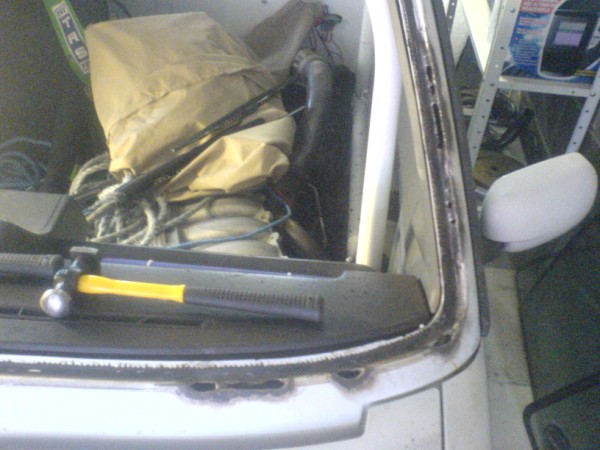
But after the initial shock I decided to do a bit of grinding, wire brushing and hammer forming and rust treatment all last night ! I've also made up some little plates that hopefully I'll get round to welding this week..

The first job being sorting out the rust around the windscreen. Over time the laminate had lifted in one of the corners of the screen and a slight crack had appeared. Then more recently a large crack appeared from top to bottom so I could no longer ignore it.
The first job was to remove the windscreen, I could have called a specialist but I would have incurred two call out charges as I need it removing and refitting at a later date once the rust had been sorted. Fortunately I have a friend who had the tools but found out the method of removal was a lot simpler than I first thought. The main kit basically involves a piece of abrasive wire and two handles that the wire sits in(shown in the top left of the picture --> ). After removing all the plastic trim, you slot the wire around and under the windscreen then start sawing, being carful not to burn the dash or chaff any of the paint work. You can make your way around all the screen but may need to finsh off with a long bladed stanley knife. I thought I'd save you the trouble and point you to all the stuff you need pictured on the right, this kit also seems to come with the rubber removal tools which is quite handy.
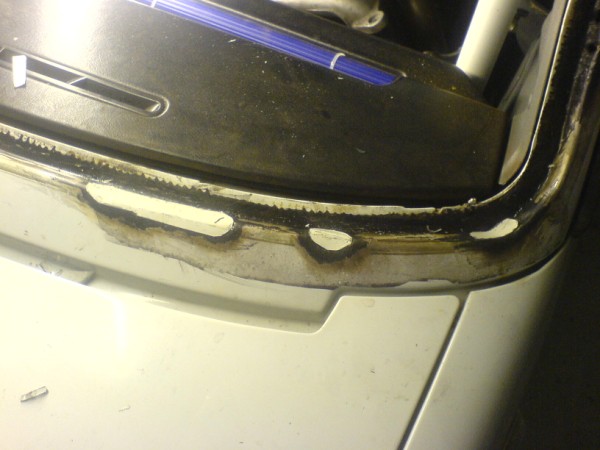
After the screen was removed, I got the wire brush out this is when I realised the rust was a little worse than first expected!
well I say rust it turned out they were actually holes
But after the initial shock I decided to do a bit of grinding, wire brushing and hammer forming and rust treatment all last night ! I've also made up some little plates that hopefully I'll get round to welding this week..
Sunday, 9 May 2010
Curborough report 9th May - May 2010
9th May - Things don't go to plan and the Clio 172 engine needs attention
Well.. my first event event didn't go too well.. I had two decent practice runs a 41.92 and a 40.74 not as good as my last visit of 38.56 and then on my first timed run about half way round disaster struck, the engine started clanging.. I'm guessing its the bottom end bearings or something. I pootled across the finish line and exited the track and went for an early bath.. The bonus being I got a time so I was first in class being the only competitor in sports libre class
I think the cause was a tired engine as it's never been checked since I bought it second hand. However, once it's fixed I'll be fitting a proper rev counter and setting the rev limited as I don't fancy a repeat of this.
On the up side of things it gives me the opportunity to replace the cam belt and whilst I'm at it the gearbox too.
With a bit of luck I should have it sorted for my return trip to Curbourgh on June 19th
Well.. my first event event didn't go too well.. I had two decent practice runs a 41.92 and a 40.74 not as good as my last visit of 38.56 and then on my first timed run about half way round disaster struck, the engine started clanging.. I'm guessing its the bottom end bearings or something. I pootled across the finish line and exited the track and went for an early bath.. The bonus being I got a time so I was first in class being the only competitor in sports libre class
I think the cause was a tired engine as it's never been checked since I bought it second hand. However, once it's fixed I'll be fitting a proper rev counter and setting the rev limited as I don't fancy a repeat of this.
On the up side of things it gives me the opportunity to replace the cam belt and whilst I'm at it the gearbox too.
With a bit of luck I should have it sorted for my return trip to Curbourgh on June 19th
Friday, 7 May 2010
Return to Curborough for the 9th of May Sprint - May 2010
8th May - Preparation for the first sprint of the year
After not getting around to changing the gearbox I'm just going to have to change up gentley if that's possible on a sprint, so expect plenty of grinding as I launch from the line. Sunday will be my first sprint of the year, I have removed the standard Renault 5 GT Turbo seats in favour of a single Sparco Pro 2000 bucket seat. Apart from this I've added another split pin to my exhaust to stop the mount from moving.
I've just got to go and get my race numbers "42" from roadrunner motorsport my local stockist and I'll be ready. With a bit of luck I should have some pictures or even in car footage up here next week depending on how my home made mount works.
I've managed to get hold of the screw that fits into the bottom of cameras, it's called a whitworth thread and I plan to weld this to a piece of metal which I will then attach via jubilee clips to my seat belt bar. This should provide a nice mount for my trusty Cannon Powershot A520 hopefully giving me some high def in-car footage on the cheap!
I've also been reading up on tyre pressures, and has prompted me to buy to items a digital tyre pressure gauge and a temperature monitoring device. I've read that if you take three temperatures across the tyre from left to right you can work out if it's over or under inflated and also whether you have to much or little camber.
For example if the middle temperature is considerably higher than the left and right the tyre is over inflated.
Anyway I've put together a sort of data log for tyre pressures and setup information. This will record all my race information neatly on a form so I can compare for next time.
If the form is any use to you feel free to click on the thumbnail then click download, it will then appear in your browser for you to print from.

After not getting around to changing the gearbox I'm just going to have to change up gentley if that's possible on a sprint, so expect plenty of grinding as I launch from the line. Sunday will be my first sprint of the year, I have removed the standard Renault 5 GT Turbo seats in favour of a single Sparco Pro 2000 bucket seat. Apart from this I've added another split pin to my exhaust to stop the mount from moving.
I've just got to go and get my race numbers "42" from roadrunner motorsport my local stockist and I'll be ready. With a bit of luck I should have some pictures or even in car footage up here next week depending on how my home made mount works.
I've managed to get hold of the screw that fits into the bottom of cameras, it's called a whitworth thread and I plan to weld this to a piece of metal which I will then attach via jubilee clips to my seat belt bar. This should provide a nice mount for my trusty Cannon Powershot A520 hopefully giving me some high def in-car footage on the cheap!
I've also been reading up on tyre pressures, and has prompted me to buy to items a digital tyre pressure gauge and a temperature monitoring device. I've read that if you take three temperatures across the tyre from left to right you can work out if it's over or under inflated and also whether you have to much or little camber.
For example if the middle temperature is considerably higher than the left and right the tyre is over inflated.
Anyway I've put together a sort of data log for tyre pressures and setup information. This will record all my race information neatly on a form so I can compare for next time.
If the form is any use to you feel free to click on the thumbnail then click download, it will then appear in your browser for you to print from.
Monday, 22 March 2010
Not for sale... - March 2010
I did think about selling but have had a change of heart and have decided to plough on..
So here are this years plans:
Rear suspension re-design
This is to lighten and improve on the existing wishbones, but still provide adjustment.
Sub frame re-design
This will get rid of the front sub-frame and make a purpose made subframe which should be both lighter and provide better mounting points
Gearbox re-condition
Pretty essential really I'm not going to win anything if I can't get second gear!
Tyres
Something softer and more suited to sprinting
Exhaust and rear bumper
Neaten up the back end, this is purely cosmetic so will probably be at the bottom of my list but it would be nice to bring it back to the standard look, I'll then have another look at the tailgate.
Oh and here's a long overdue clip from my visit to Curborough :)
A Summary
Well being as I wrote a huge advert to sell the Renault, I might as well display it here as it gives a good summary of the project to date.. So here it is:
So here are this years plans:
Rear suspension re-design
This is to lighten and improve on the existing wishbones, but still provide adjustment.
Sub frame re-design
This will get rid of the front sub-frame and make a purpose made subframe which should be both lighter and provide better mounting points
Gearbox re-condition
Pretty essential really I'm not going to win anything if I can't get second gear!
Tyres
Something softer and more suited to sprinting
Exhaust and rear bumper
Neaten up the back end, this is purely cosmetic so will probably be at the bottom of my list but it would be nice to bring it back to the standard look, I'll then have another look at the tailgate.
Oh and here's a long overdue clip from my visit to Curborough :)
A Summary
Well being as I wrote a huge advert to sell the Renault, I might as well display it here as it gives a good summary of the project to date.. So here it is:
The conversion
I originally started the conversion in February 2005 and it was March 2006 when I first had it on the road and MOT'd. At that time it had the original renault 5 GT Turbo engine in (slightly uprated) but in early 2008 the turbo went and at the same time I embarked on renovating my house so didn't have time to fix it. However by February 2009 I had picked up a Clio phase 2 172 engine and aftermarket Emerald ECU and had decided this was the way to go if I wanted trouble free performance motoring as the theory is you have less components to worry about. Mid 2009 the car was ready and after a few teething problems mostly down to needing a full tune the car was ready for my first sprint!
I have quite a few photos and details of the first build phase on my website www.gomodit.co.uk, but not so many for the second phase this is something I plan to do. I re-designed the rear compartment in the second phase to be more like the original Renault 5 Turbo 1/2's of the 80's. This also meant there is now a proper sealed fire barrier between me and the engine which was essentially to get it past the scrutineers at a sprint day. This has been created with a steel frame providing additional structure, a steel panel between driver and engine.Plus an aluminium top cover to keep the weight down.
The engine sits in the original renault 5 subframe, and is bolted to a heavy duty crossmember which in turn is fixed to the original rear subframe mounting points. The rear of the subframe is bolted to fabricated mounts which are welded to the rear chassis rails. The rear engine mount whilst standard has been lowered to clear the clio exhaust manifold. The clio top mount has been used to prevent sideways movement and an additional front tie bar has been fabricated to stop engine movement under hard acceleration.
The car is road legal and is taxed and MOT'd til August 2010. I Insure, as being rear wheel drive and based the policy on a Clio 172 with all the mods declared it costs me £360 TPF&T based on a 34yr old with full no claims.
The rear end of this car whilst using mostly standard parts, although it does have modified rear suspension arms to reduce bump steer, this was taken from a modification they use on a pontiac fiero.
The bad bits
It no longer has the bucket seat in one of the photos as that was borrowed for my sprint day
If going from first to second at speed the gearbox will crunch - I'll be honest I think this may be the synchromesh but haven't investigated in detail
There is a bit of rust around the front screen and the odd mark here and there but on the whole excellent condition!
Now onto the good bits
The engine is in the back! and with the Clio 172 engine in this absolutely flies and at my last sprint event posted a quite reasonable time for a first day out. The best thing is that the engine as standard gives around 170bhp so in this state of tune you can run it all day without worry.
Spec is as follows:
- Clio 172 Phase 2 Engine (approx 66k miles when bought) with Phase 1 throttle body (cable type)
- Emerald ECU see www.emeraldm3d.com this will give flexiblity if you want to turbo/supercharge or just modifiy the engine further in the future.
- Four paddle clutch
- recently tuned by Dave Walker of Emerald (seen in the practical performance car magazine) it gave 183bhp (see printout in pictures)
- Full safety devices roll cage with door bars and additional cross bar for harnesses
- 6 point TRS harnesses
- Lotus Elise Stainless exhaust
- Removable engine cover in aluminium
- Professionally Fabricated aluminium fuel tank
- Coilovers these are standard shocks with a coilover conversion see my article http://gomodit.blogspot.com/2007/12/...-december.html
- Spare koni adjustables (ph1 for the front) and a pair of cup shocks (ph2 for the rear) that will go with the car but will need converting to coilovers first – this shouldn't cost as you could use the kit from the shock absorbers already on the car.
- Up-rated discs and pads, I’m not sure which but they stop the car.
- Hydraulic handbrake and brake bias for manually adjusting how much braking the rear gets
- Hydraulic clutch for a lighter pedal and does away with an extra cable
- Fire extinguisher never used

Thursday, 12 November 2009
Renault 5 GT Turbo conversion - October 2009
My first Sprint at Curburough
Well there's been many changes since Febuary and if I get chance I'll try and post them. However here's a few pictures from my first Hill climb / Sprint event at Curburough.


I'll try and get some video's of the car in action, it handled extremely well after setting up the tyre pressures.
I did have a problem with my gearbox as selecting 2nd gear this was a problem which did hamper my standing starts, this is where you can make up vital seconds but didn't spoil the day.
I also plan (when I get time) to replace the standard shock absorbers for upgrated ones I have recently bought. These are a set of koni's for the front and a pair of renault 5 "cup" shock absorbers for the rear. I managed to pick both up for a reasonable price a while back which providing I reuse my coilover kits will be quite a bargin for a set of adjustable coilovers!
Well there's been many changes since Febuary and if I get chance I'll try and post them. However here's a few pictures from my first Hill climb / Sprint event at Curburough.
I'll try and get some video's of the car in action, it handled extremely well after setting up the tyre pressures.
I did have a problem with my gearbox as selecting 2nd gear this was a problem which did hamper my standing starts, this is where you can make up vital seconds but didn't spoil the day.
I also plan (when I get time) to replace the standard shock absorbers for upgrated ones I have recently bought. These are a set of koni's for the front and a pair of renault 5 "cup" shock absorbers for the rear. I managed to pick both up for a reasonable price a while back which providing I reuse my coilover kits will be quite a bargin for a set of adjustable coilovers!
Friday, 20 February 2009
Renault 5 GT Turbo conversion - February 2009
22nd February - The Clio sport 172 engine is in the Renault 5
With the aid of an old wheel barrow and some will power I managed to lump the engine onto the gearbox and jack it up ready for fixing. So the engine is in although still many jobs to do.
The top two jobs are:
1)Fabricate an engine stabiliser mount as this isn't a Clio there's nothing to bolt it up to so this will need to be made
2)Modify the exhaust manifold, not sure how I'm going to do this. First stop will be to find some 45mm tubing and work out where I want the exhaust to end up.
Here's some pictures


With the aid of an old wheel barrow and some will power I managed to lump the engine onto the gearbox and jack it up ready for fixing. So the engine is in although still many jobs to do.
The top two jobs are:
1)Fabricate an engine stabiliser mount as this isn't a Clio there's nothing to bolt it up to so this will need to be made
2)Modify the exhaust manifold, not sure how I'm going to do this. First stop will be to find some 45mm tubing and work out where I want the exhaust to end up.
Here's some pictures


Monday, 15 December 2008
Renault 5 GT Turbo conversion - December 2008
Getting it togeather
Phase 1 throttle body to make life a lot simpler with cable operation as opposed to fly by wire!
Four paddle clutch used but plent of life, no more slipping clutch!!
Phase 1 throttle body to make life a lot simpler with cable operation as opposed to fly by wire!
 |
| From 172 conversion |
 |
| From 172 conversion |
Saturday, 27 September 2008
RTOC national day at Mallory Park
For those that don't know RTOC stands for Renault Turbo Owners Club www.rtoc.org, today was national day at Mallory Park. It was a great chance to put some faces to names and generally mingle. Anyway here's a collection of footage from the day consisting of oddly enough Renault 5 GT turbo 's, a sideways Renault 5 turbo, a Renault GTA and few other turbo'd motors.
Below are a several of my favorite pictures of the day the rest are available on My Photobucket account. Please if any of these are your car's let me know and I can send you a full size image if you like.


Below are a several of my favorite pictures of the day the rest are available on My Photobucket account. Please if any of these are your car's let me know and I can send you a full size image if you like.


Tuesday, 23 September 2008

Yes that is a jerry can, It was the cheapest way I could find to create a fuel tank.I simply bought a length of 10mm steel tube from B&Q and drill three holes - one for the feed, one for the return and one for a breather. I have used this tank with no problems and as you can image the original design of the jerry can is to be a robust way of transporting flammable liquids so safety isn't an issue. I'll post a guide on the various stages of mounting and creating the tank later. The only thing missing is a fuel sender although I know roughly how many miles I can do from a tank - usually about 80 miles :)

After a day of cutting out metal from the rear of the car, I could resist putting the subframe in situ just to see what it looked like in the back, at this point I had a very long way to go!!

This is one of my homemade coilovers using a kit bought from Rally Design, the cheapest coilovers retail for around £300 for a pair, this cost me £30 plus a pair of springs (less than £20) . Providing you don't weld the kits on too aggressively they are reusable on another set of shocks - when I get the money I'll by a set of uprated dampers and convert them. I'll post a guide of how to convert shock absorbers later

Saturday, 20 September 2008
The Renault Is Returning
I'll soon be starting work on the next phase the fitting of a Clio 172 engine to my Renault 5 Turbo!
The main reason being reliability, being normally aspirated (not turbocharged) but still providing the same power - well actually a bit more, means there are less components to fail.
My first thing that needs doing is to lay some new slabs on my drive!
The main reason being reliability, being normally aspirated (not turbocharged) but still providing the same power - well actually a bit more, means there are less components to fail.
My first thing that needs doing is to lay some new slabs on my drive!
Thursday, 18 September 2008
What's this about?

This is my car, it's a Renault 5 GT Turbo built in 1991. In 2004 I started to convert it from front to rear wheel drive. I'm not sure there was one particular reason why I started, but I did! I completed it in January 2007 when passed it's MOT.
It's certainly more of a fun car than practical, but I do use it as a daily driver (when on the road) . Although my main aim is to go hill climbing or sprinting.
Throughout my webpages or blogs you will be able to read about the conversion itself among other conversions such as my MK2 Fiesta XR2 turbo or should I say turbo's as I've had a few. Throughout the pages you will find guides on how to do these conversions yourself and various other snippets of information.. if you wished :)
Lets see where this goes...
Sunday, 16 December 2007
Renault 5 GT Turbo conversion - December 06 Coilovers
How to convert to coilovers
This is a guide on converting your shock absorbers to coilovers, using your existing shock absorbers and an adjustable spring seat kit.
This is a great way of having adjustable ride height without the cost. Once converted you can run any 2 1/4" spring that will fit between your platform and the underside of your strut top.Here's a picture of the kit

First of all you need the kit from somewhere like Rally Design, bare in mind you struts need to be less than 2" in diameter or you may have to find a more specialised product, also when you order pay attention to whether the top of your strut is either a round 10mm or D shape.
My conversion was done on my Renault 5 GT Turbo that I have converted to rear wheel drive, I have used phase 1 shock absorbers on the front and phase two on the rear. You can use either phase shock on either phase car providing you use the matching strut top. One other distance is the total length of the shoch absorber travel which caught me out when ordering the springs.
The process of fitting the coilover kit is actually quite straight forward. First follow your trusty Haynes manual to remove the shock absorber and with the aid of a set of spring compressors (quite a cheap tool) compress the spring and remove te strut top.
Then remove the springs from the strut.

Once these are off you can slip the new spring platforms over the shock absorber, you may need to file down any lumps or bumps stopping the threaded tube reaching the old spring platform.
At this point you have two options 1)leave as it is and tack (weld) the sleeve to the strut or 2)remove the majority of the old spring platform. I removed mine mainly because it gave me a lot more room to work and more options to change the shape of my suspension turrets at a later date, it also made them look a bit more like factory coilovers (if I were to spray them).
Either way you will need to tack the threaded sleeve to your strut, you need to be careful at this point as I have been told not to get the strut to hot as it could damage the shock absorber. My best advice is to prepare where you are welding making sure the metal is clean and look for points where the sleeve and shock are already touching as opposed to trying to bridge a gap.
Okay with the sleeve secured, now would be a good time to clean up the shock absorber and paint if desired (don't paint the threaded sleeve) I put a bit of copper grease on my sleeve this gives it a little protection against corrosion.
Now thread your two threaded collars onto the thread and wind them down to the bottom as far as they will go without forcing them. The reason for two is that one will lock the other, ideally you will want a 'C' spanner for adjustment they aren't very expensive around £5 each
Next on will go your spring - Springs will require a bit of research hopefully the guys where you bought the kit from will be able to give you advice as there's a huge range of poundage and lengths
Following this by the last part of the kit the top spring seat, hopefully you bought the right one and it fitted nicely, finally re-fit your strut top assembly which should go over the top. Despite choosing what I thought was the right size I needed to bore the hole out so I could get the original strut top back on. I did this with my pillar drill ensuring the hole remained central as this part is to keep the spring in line.

Just before you fit the shocks back to your car make sure you nip up the height adjustable collars so that the spring isn't wobbling around.
There you have it fully adjustable ride height


This is a guide on converting your shock absorbers to coilovers, using your existing shock absorbers and an adjustable spring seat kit.
This is a great way of having adjustable ride height without the cost. Once converted you can run any 2 1/4" spring that will fit between your platform and the underside of your strut top.Here's a picture of the kit

First of all you need the kit from somewhere like Rally Design, bare in mind you struts need to be less than 2" in diameter or you may have to find a more specialised product, also when you order pay attention to whether the top of your strut is either a round 10mm or D shape.
My conversion was done on my Renault 5 GT Turbo that I have converted to rear wheel drive, I have used phase 1 shock absorbers on the front and phase two on the rear. You can use either phase shock on either phase car providing you use the matching strut top. One other distance is the total length of the shoch absorber travel which caught me out when ordering the springs.
The process of fitting the coilover kit is actually quite straight forward. First follow your trusty Haynes manual to remove the shock absorber and with the aid of a set of spring compressors (quite a cheap tool) compress the spring and remove te strut top.
Then remove the springs from the strut.

Once these are off you can slip the new spring platforms over the shock absorber, you may need to file down any lumps or bumps stopping the threaded tube reaching the old spring platform.
At this point you have two options 1)leave as it is and tack (weld) the sleeve to the strut or 2)remove the majority of the old spring platform. I removed mine mainly because it gave me a lot more room to work and more options to change the shape of my suspension turrets at a later date, it also made them look a bit more like factory coilovers (if I were to spray them).
Either way you will need to tack the threaded sleeve to your strut, you need to be careful at this point as I have been told not to get the strut to hot as it could damage the shock absorber. My best advice is to prepare where you are welding making sure the metal is clean and look for points where the sleeve and shock are already touching as opposed to trying to bridge a gap.
Okay with the sleeve secured, now would be a good time to clean up the shock absorber and paint if desired (don't paint the threaded sleeve) I put a bit of copper grease on my sleeve this gives it a little protection against corrosion.
Now thread your two threaded collars onto the thread and wind them down to the bottom as far as they will go without forcing them. The reason for two is that one will lock the other, ideally you will want a 'C' spanner for adjustment they aren't very expensive around £5 each
Next on will go your spring - Springs will require a bit of research hopefully the guys where you bought the kit from will be able to give you advice as there's a huge range of poundage and lengths
Following this by the last part of the kit the top spring seat, hopefully you bought the right one and it fitted nicely, finally re-fit your strut top assembly which should go over the top. Despite choosing what I thought was the right size I needed to bore the hole out so I could get the original strut top back on. I did this with my pillar drill ensuring the hole remained central as this part is to keep the spring in line.

Just before you fit the shocks back to your car make sure you nip up the height adjustable collars so that the spring isn't wobbling around.
There you have it fully adjustable ride height


Thursday, 15 February 2007
Renault 5 GT Turbo conversion - Febuary 2007
February 07 - Hydraulic Clutch Conversion for Renault 5 GT Turbo
Here's are some details of my hydraulic clutch conversion on my Renault 5 GT Turbo. I have had a number of problems with the extended clutch cable I originally had made this is probably due to the length of the cable and the weight of the clutch. The cable finally gave way one fine morning on the way to work, fortuanley only a couple of streets away I manged to start it in 1st gear and get the car home.
Since the conversion I've only had it on the road for a day but the feel is unbelievable it's like driving a new car not because it feels anyway new but the pedal is so light the only comparable car I've been in has been brand new... Anyway here's a list of the parts used...
The first three parts I got from a scrap yard for a bit of elbox grease and £30 - bargin!!
This is the bracket for the slave cylinder, the first being the cardboard template and marked metal the second being part made


Here another picture of the bracket nearing completion and a shot of the clutch release arm as it was prior to welding


Now this is the arm after welding I cut a bit of a clutch release arm from the scrap yard that already had a hydraulic clutch and simply filed it and welded it to the exisitng, the second picture maybe a little hard to work out but is a shot under the dash where the new pedal and braket mounts to, it was in line with the bolt for the windowwiper motor so I just drilled through and used a longer bolt (kind of lucky really)


Here is the pedal in situ with the rest as you can see it's now a million miles away from the old position, the second is a shot of the master cylinder under the engine bay


More shots of the Master cylinder it has a lot smaller profile that I imagined so I see no reason why it couldn't be fitted to front engine R5's as an alternative to the long arm conversion


Here's are some details of my hydraulic clutch conversion on my Renault 5 GT Turbo. I have had a number of problems with the extended clutch cable I originally had made this is probably due to the length of the cable and the weight of the clutch. The cable finally gave way one fine morning on the way to work, fortuanley only a couple of streets away I manged to start it in 1st gear and get the car home.
Since the conversion I've only had it on the road for a day but the feel is unbelievable it's like driving a new car not because it feels anyway new but the pedal is so light the only comparable car I've been in has been brand new... Anyway here's a list of the parts used...
- MR2 MK1 clutch pedal and housing
- MR2 MK1 master cylinder and first section of pipe
- Toyota Starlet (I think) slave cylinder
- Bit of copper 3/16th pipe - £3.49
- A rubber brake hose (from rear of GT turbo with two female ends) - £free
- 4x male brake unions - £3.96
The first three parts I got from a scrap yard for a bit of elbox grease and £30 - bargin!!
This is the bracket for the slave cylinder, the first being the cardboard template and marked metal the second being part made


Here another picture of the bracket nearing completion and a shot of the clutch release arm as it was prior to welding


Now this is the arm after welding I cut a bit of a clutch release arm from the scrap yard that already had a hydraulic clutch and simply filed it and welded it to the exisitng, the second picture maybe a little hard to work out but is a shot under the dash where the new pedal and braket mounts to, it was in line with the bolt for the windowwiper motor so I just drilled through and used a longer bolt (kind of lucky really)


Here is the pedal in situ with the rest as you can see it's now a million miles away from the old position, the second is a shot of the master cylinder under the engine bay


More shots of the Master cylinder it has a lot smaller profile that I imagined so I see no reason why it couldn't be fitted to front engine R5's as an alternative to the long arm conversion


Friday, 15 December 2006
Renault 5 GT Turbo conversion - December 06
30 DecemberContinued with the firewall divider I also put the calipers on, does anyone know where the clip on the pitcure below is supposed to be?


29 DecemberStarted work on the firewall divider


28 DecemberMade coilovers, found out that phase 1 springs are actually two inches shorter than Phase 2 items so my springs for the rear are a touch two long so these will need to be returned, relocated fuel vent
22 December With only an hour to spare I tried to get the suspension tops off. After many different methods of gripping them in the vice I found that undoing the bolt in the right direction works best, Although I’m sure soaking them in wd40 overnight helped. Thinking I was on a role I attempted the rear callipers with an 8mm spanner to hand I successfully snapped the bleed nipple clean off that was quite enough For one day!
20 DecemberSecured clutch and accelerator cables
19 DecemberSo far today I have bought enough 16x16mm mild steel to make the firewall, along with the existing sheet steel I can make it as I wanted and always build an aluminium one at a later date to save a little weight
18 DecemberI installed the hydraulic handbrake it was quite straight forward but a little time consuming. I had to make a platform to raise the brake Cylinder then add a bracket to the handbrake itself once done It was time to flare the brake pipe ends and Connect it up I was going to start bleeding the brakes but the first nipple I came to was seized what a surprise so I called it a night !

17 DecemberI was going to have the day off today but instead I took the polycarbonate round to my father-in-laws to cut it to Shape for the divider and side windows. Next up was the hydraulic hand brake but I only got round to collecting the flaring tool so hopefully that'll be a job for tomorrow night

16 DecemberAfter all the excitements of starting the engine it was time to get aback to more mundane tasks, there’s nothing worse than having to go back over things that you have already done but they need doing it if it is going to be safe on the road. One d the things was the cross-member and mounting points for the Sub-frame. The sub-frame needed to be lowered for more clearance and gave me the opportunity to sink the Cross-member further down to provide that extra bit of strength. This took me pretty much all day, I may have done it a little a little quicker, if I hadn’t had a small fire!! A bit of welding splat ignited a cloth full of meths… oh well no damage done but a lesson learnt. My plan was to get the coilover kit onto the shocks but I couldn’t get the bolt off the top of the struts so I just placed the shocks on as they were and as expected the front sits considerably higher than I want. The only other thing was to fit the two cables both seem to work okay although the clutch was a little stiff. mind you it was before…


13 DecemberStill revelling in my triumph of starting the engine I decided to mount the rear bumper to begin making the car look a little more road going, just a lot of grinding, drilling really making a hole for the new exhaust position and opening the bottom vent up to allow better air flow through the oil cooler, all in all it doesn't look to rough and it fits quite snug. I also Connected boost gauge and changed rear bulb


12 DecemberOne other quite essential job is to build a firewall between me and the engine, ideally I would like it to be made out of aluminium but I have a feeling the first one at least will be made out of mild steel as it's more readily available and considerably cheaper (oh and I've never welded aluminium :) . I drew up a drawing of the firewall and tool a trip to Leengate metals to get a price on aluminium, if you're really interested it can be seen here
11 DecemberDetermined to get this show on the road I took in my clutch and Accelerator cables to speedo-graph which as a matter of luck was just round the corner from me, they were very friendly and said they could turn them around within the week, I asked for them both to be 3.6m tip to tip, which if I'm honest was possibility a touch long for the clutch cable but we'll see what happens. I also rang Amari plastics and gave measurements again these will be available by the end of the week.. the suppliers details can be found here on my costs page
10 DecemberFinally a huge milestone, I started the engine!! at approx 8.30pm on Saturday night much to the dismay of my neighbours the reno awoke.. the only stopping point was a sticking starter motor which after a few try's burst into life and never gave me any hassle after that.. now the next step is to get it out on the road, I'm hoping for a road test before Christmas but we'll see.. Anyway here's a quick video as you can hear from my wife it was quite an exciting time :)
08 DecemberWell the Wii has been released today not that there's any left to buy!! last night my friend came round and brough his brake flaring tool so we got most of the brake pipes done except the ones to the brake bias as unfortuanly it used what I can only imagine as imperial connections so I'll have to nip to transco to get the right connectors, I started work on mounting the oil cooler which I have found a suitable place at the rear. The only other thing I managed to do was brake the clutch pedal.. so that's going to need fix soon!


07 Decemberfinished clutch cable coupler.. bit of a mouthfull!! not sure I'm entirely happy with it until the engine is running I'll not know for sure if it's lifting the clutch another so may have to revisit this see first pic below. Next up was the fuel pressure regualtor that was quite straight forwardmodifying an original bracket see below. I finished off the front to rear water hoses these are all jubilee clipped up! I also put a jubiliee clip arround the handbrake cables as you can see in the picture for some reason they keep popping out I'm hoping once the brakes are bled I shouldn't need as much force to apply the handbrake ellivating this issue finally the brake bias adjuster is also in place seen in the same picture..As you can see by the final picture I think this evening should be spent tidying up!!


04 DecemberToday was a bracket making day, one for the brake bias adjuster, one for the clutch cable coupler, one for the front clutch cable to sit in, one for the fuel pressure regualtor and one for the fuel pump all in all quite successful although they do need finishing which hopefully will be fitted this week
03 DecemberPictures to follow.. I spent today in the scrap yard pulling out the gearchange mechanism from an MR2 the reason? well it's a cable type system versus my current rod setup, apart from looking sleeker ie no rods hanging down it will give a lot more solid feel to the gearchange (once fitted that is!!) but thats for another day, I also got the right sized hoses for to finish the plumbing
01 DecemberYeah Decembers here, hopefully this will be the month I at least fire her up!! Last night I finished the wiring (apart from the main battery cable)refitted the alternator and starter motor, replaced the TDC sensor and tidied up the wiring into the balck plastic conduits. I also finished the plumbing at the front of the car and made a start at the rear I just need one 32mm bendy hose and a bit of 32mm pipe to finish, lets see what the weekend brings. Here's a few progress pictures, the last picture is underneath looking at the connections for the main water hoses


29 DecemberStarted work on the firewall divider


28 DecemberMade coilovers, found out that phase 1 springs are actually two inches shorter than Phase 2 items so my springs for the rear are a touch two long so these will need to be returned, relocated fuel vent
22 December With only an hour to spare I tried to get the suspension tops off. After many different methods of gripping them in the vice I found that undoing the bolt in the right direction works best, Although I’m sure soaking them in wd40 overnight helped. Thinking I was on a role I attempted the rear callipers with an 8mm spanner to hand I successfully snapped the bleed nipple clean off that was quite enough For one day!
20 DecemberSecured clutch and accelerator cables
19 DecemberSo far today I have bought enough 16x16mm mild steel to make the firewall, along with the existing sheet steel I can make it as I wanted and always build an aluminium one at a later date to save a little weight
18 DecemberI installed the hydraulic handbrake it was quite straight forward but a little time consuming. I had to make a platform to raise the brake Cylinder then add a bracket to the handbrake itself once done It was time to flare the brake pipe ends and Connect it up I was going to start bleeding the brakes but the first nipple I came to was seized what a surprise so I called it a night !

17 DecemberI was going to have the day off today but instead I took the polycarbonate round to my father-in-laws to cut it to Shape for the divider and side windows. Next up was the hydraulic hand brake but I only got round to collecting the flaring tool so hopefully that'll be a job for tomorrow night

16 DecemberAfter all the excitements of starting the engine it was time to get aback to more mundane tasks, there’s nothing worse than having to go back over things that you have already done but they need doing it if it is going to be safe on the road. One d the things was the cross-member and mounting points for the Sub-frame. The sub-frame needed to be lowered for more clearance and gave me the opportunity to sink the Cross-member further down to provide that extra bit of strength. This took me pretty much all day, I may have done it a little a little quicker, if I hadn’t had a small fire!! A bit of welding splat ignited a cloth full of meths… oh well no damage done but a lesson learnt. My plan was to get the coilover kit onto the shocks but I couldn’t get the bolt off the top of the struts so I just placed the shocks on as they were and as expected the front sits considerably higher than I want. The only other thing was to fit the two cables both seem to work okay although the clutch was a little stiff. mind you it was before…


13 DecemberStill revelling in my triumph of starting the engine I decided to mount the rear bumper to begin making the car look a little more road going, just a lot of grinding, drilling really making a hole for the new exhaust position and opening the bottom vent up to allow better air flow through the oil cooler, all in all it doesn't look to rough and it fits quite snug. I also Connected boost gauge and changed rear bulb


12 DecemberOne other quite essential job is to build a firewall between me and the engine, ideally I would like it to be made out of aluminium but I have a feeling the first one at least will be made out of mild steel as it's more readily available and considerably cheaper (oh and I've never welded aluminium :) . I drew up a drawing of the firewall and tool a trip to Leengate metals to get a price on aluminium, if you're really interested it can be seen here
11 DecemberDetermined to get this show on the road I took in my clutch and Accelerator cables to speedo-graph which as a matter of luck was just round the corner from me, they were very friendly and said they could turn them around within the week, I asked for them both to be 3.6m tip to tip, which if I'm honest was possibility a touch long for the clutch cable but we'll see what happens. I also rang Amari plastics and gave measurements again these will be available by the end of the week.. the suppliers details can be found here on my costs page
10 DecemberFinally a huge milestone, I started the engine!! at approx 8.30pm on Saturday night much to the dismay of my neighbours the reno awoke.. the only stopping point was a sticking starter motor which after a few try's burst into life and never gave me any hassle after that.. now the next step is to get it out on the road, I'm hoping for a road test before Christmas but we'll see.. Anyway here's a quick video as you can hear from my wife it was quite an exciting time :)
08 DecemberWell the Wii has been released today not that there's any left to buy!! last night my friend came round and brough his brake flaring tool so we got most of the brake pipes done except the ones to the brake bias as unfortuanly it used what I can only imagine as imperial connections so I'll have to nip to transco to get the right connectors, I started work on mounting the oil cooler which I have found a suitable place at the rear. The only other thing I managed to do was brake the clutch pedal.. so that's going to need fix soon!


07 Decemberfinished clutch cable coupler.. bit of a mouthfull!! not sure I'm entirely happy with it until the engine is running I'll not know for sure if it's lifting the clutch another so may have to revisit this see first pic below. Next up was the fuel pressure regualtor that was quite straight forwardmodifying an original bracket see below. I finished off the front to rear water hoses these are all jubilee clipped up! I also put a jubiliee clip arround the handbrake cables as you can see in the picture for some reason they keep popping out I'm hoping once the brakes are bled I shouldn't need as much force to apply the handbrake ellivating this issue finally the brake bias adjuster is also in place seen in the same picture..As you can see by the final picture I think this evening should be spent tidying up!!


04 DecemberToday was a bracket making day, one for the brake bias adjuster, one for the clutch cable coupler, one for the front clutch cable to sit in, one for the fuel pressure regualtor and one for the fuel pump all in all quite successful although they do need finishing which hopefully will be fitted this week
03 DecemberPictures to follow.. I spent today in the scrap yard pulling out the gearchange mechanism from an MR2 the reason? well it's a cable type system versus my current rod setup, apart from looking sleeker ie no rods hanging down it will give a lot more solid feel to the gearchange (once fitted that is!!) but thats for another day, I also got the right sized hoses for to finish the plumbing
01 DecemberYeah Decembers here, hopefully this will be the month I at least fire her up!! Last night I finished the wiring (apart from the main battery cable)refitted the alternator and starter motor, replaced the TDC sensor and tidied up the wiring into the balck plastic conduits. I also finished the plumbing at the front of the car and made a start at the rear I just need one 32mm bendy hose and a bit of 32mm pipe to finish, lets see what the weekend brings. Here's a few progress pictures, the last picture is underneath looking at the connections for the main water hoses


Subscribe to:
Posts (Atom)
-
 How to Convert | Wiring it up | FAQ | My build diary Here is a list of commonly asked questions from people trying to put the RS Turbo en...
 -
 How to Convert | Wiring it up | FAQ | My build diary This is an overview of the conversion process for transplanting the Escort RS Turbo ...
 -
The conversion I originally started the conversion in February 2005 and it was March 2006 when I first had it on the road and MOT'd. At ...